Supplies Needed
Supplies
To hatch chicks successfully, you’ll need some basic supplies. Here is what we recommend:
- Incubator
- Eggs
- Distilled water
- Candler or Flashlight
- Pencil
- Brooder
- Heat Lamp
- Drawer Liner
- Bedding
- Food
- Water & Food Containers
- Netting
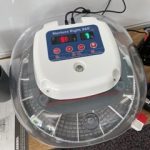
Incubator
You will definitely need a good, reliable incubator for your eggs.
OUR FAVORITE: This is the incubator we use in our classroom. Our school now has FIVE of these, and they have worked great for a number of years.
UNDER $100: This incubator is less than $100! It is smaller and only holds 12 eggs. It has a great rating on Amazon.
UNDER $50: This incubator is under $50! It doesn’t have many reviews on Amazon, but the ones that are listed are mostly positive. This might be a great choice if you are just trying this experiment for the first time and are not sure if you will continue with it.
Candling Light
Getting to see the embryos develop throughout this experiment is such a wonderful opportunity. When candling eggs. My class usually uses the candling light on our incubator (see above). If not, we use a flashlight from our room.
Brooder
Once your chicks hatch, they will need some time to fluff up inside the incubator. Once they are fluffy, they are ready to be moved into some kind of brooder. There are some brooders available for purchase, but we suggest simply making your own with the following supplies. See below for links.
A large storage bucket (any large, clean bucket)
- Heat Lamp & Bulb
- Drawer Liner
- Bedding
- Food
- Food & Water Containers
- Netting
Thermometer
Make sure to read our Blog post “Make Your Own Brooder.”
Heat Lamp
As the chicks grow, they will require less and less heat. When they are first moved from the incubator, they need a place that stays at about 95 degrees. To do this, I would suggest a heat lamp. In the past, I’ve tried a heat table. After about one cycle of chicks, it fell apart. The plastic top fell off, the wires frayed, and I became too nervous to leave it with the little chicks.
Since then, I’ve been using a traditional heat lamp. I would suggest something like this lamp, which clips onto the side of the bucket, and this bulb.
After first I was nervous about this targeted heat, but we haven’t had any issues. The clip stay secure, and the head stays in a safe range (even over night!).
Drawer Liner
Drawer liner is not necessary, but it helps a lot with the smell of the brooder. I’ve had chicks in the classroom without using drawer liners in the brooder, and I’ve had them in the classroom with drawer liners. I will most definitely continue using drawer liner! The difference is very noticeable!
Drawer Liners do two things that I really appreciate when having my own brooder in the classroom. First, it traps a lot of smell. Chicks can be messy! And smelly! This is a quick trick decrease the “animal smell” in your space. It also makes cleaning out the brooder slightly easier. I simply put on gloves and roll up the drawer liner (with the bedding on top). I then use the sanitizing wipes to clean out the rest of the bedding and the plastic sides and bottom of the brooder.
Bedding
Chicks need bedding to make them more comfortable and keep the warmth in. You will need to line your brooder with bedding. We suggest this bedding which I find to smell fine in the classroom. I pour it over the drawer liner until the liner is no longer visible. Don’t be surprised to find your chicks have kicked the bedding all over!
My parents love this bedding for their brooder and coop.
Food
You might be surprised at how much food the little chicks can eat! We use this kind.
Food & Water Containers
The food and water containers took me a few years to figure out. At first, I gave the chicks little bowls of water to drink from. They were ok, but the chicks often kicked bedding into them and knocked them over. I have loved this food container and this water container instead.
Netting
It won’t be long until your chicks are flapping their wings and getting some air. While they won’t be able to fly like a robin, chicks still can get into the air and escape the brooder. This has happened to me before, and I’ve had to get called over the loud speaker to come get my loose chicken! Instead, I’d suggest using this netting to lightly drape over the brooder. It’s flexible and easy to apply.
Thermometer & Scale
In an effort to keep the chicks comfortable, we use a thermometer to monitor the temperature inside the brooder. This is the one we like using.
We also use a scale to measure the weight of the eggs. We have enjoy this one.
Sanitizing Wipes
As you can imagine, the brooder needs to get cleaned out regularly. I suggest using plastic gloves and sanitizing wipes like these. I use these in the brooder and on all of the supplies.
Plastic Gloves
Plastic gloves are a staple in my classroom. They are great for the chicken project too! Especially when cleaning. Here is an example of some that might work.
As an Amazon Associate I earn from qualifying purchases.